“There’s no reason to hurry when we’re on the earth that moves.”
-“  “
“
Check out the full code on my GitHub!
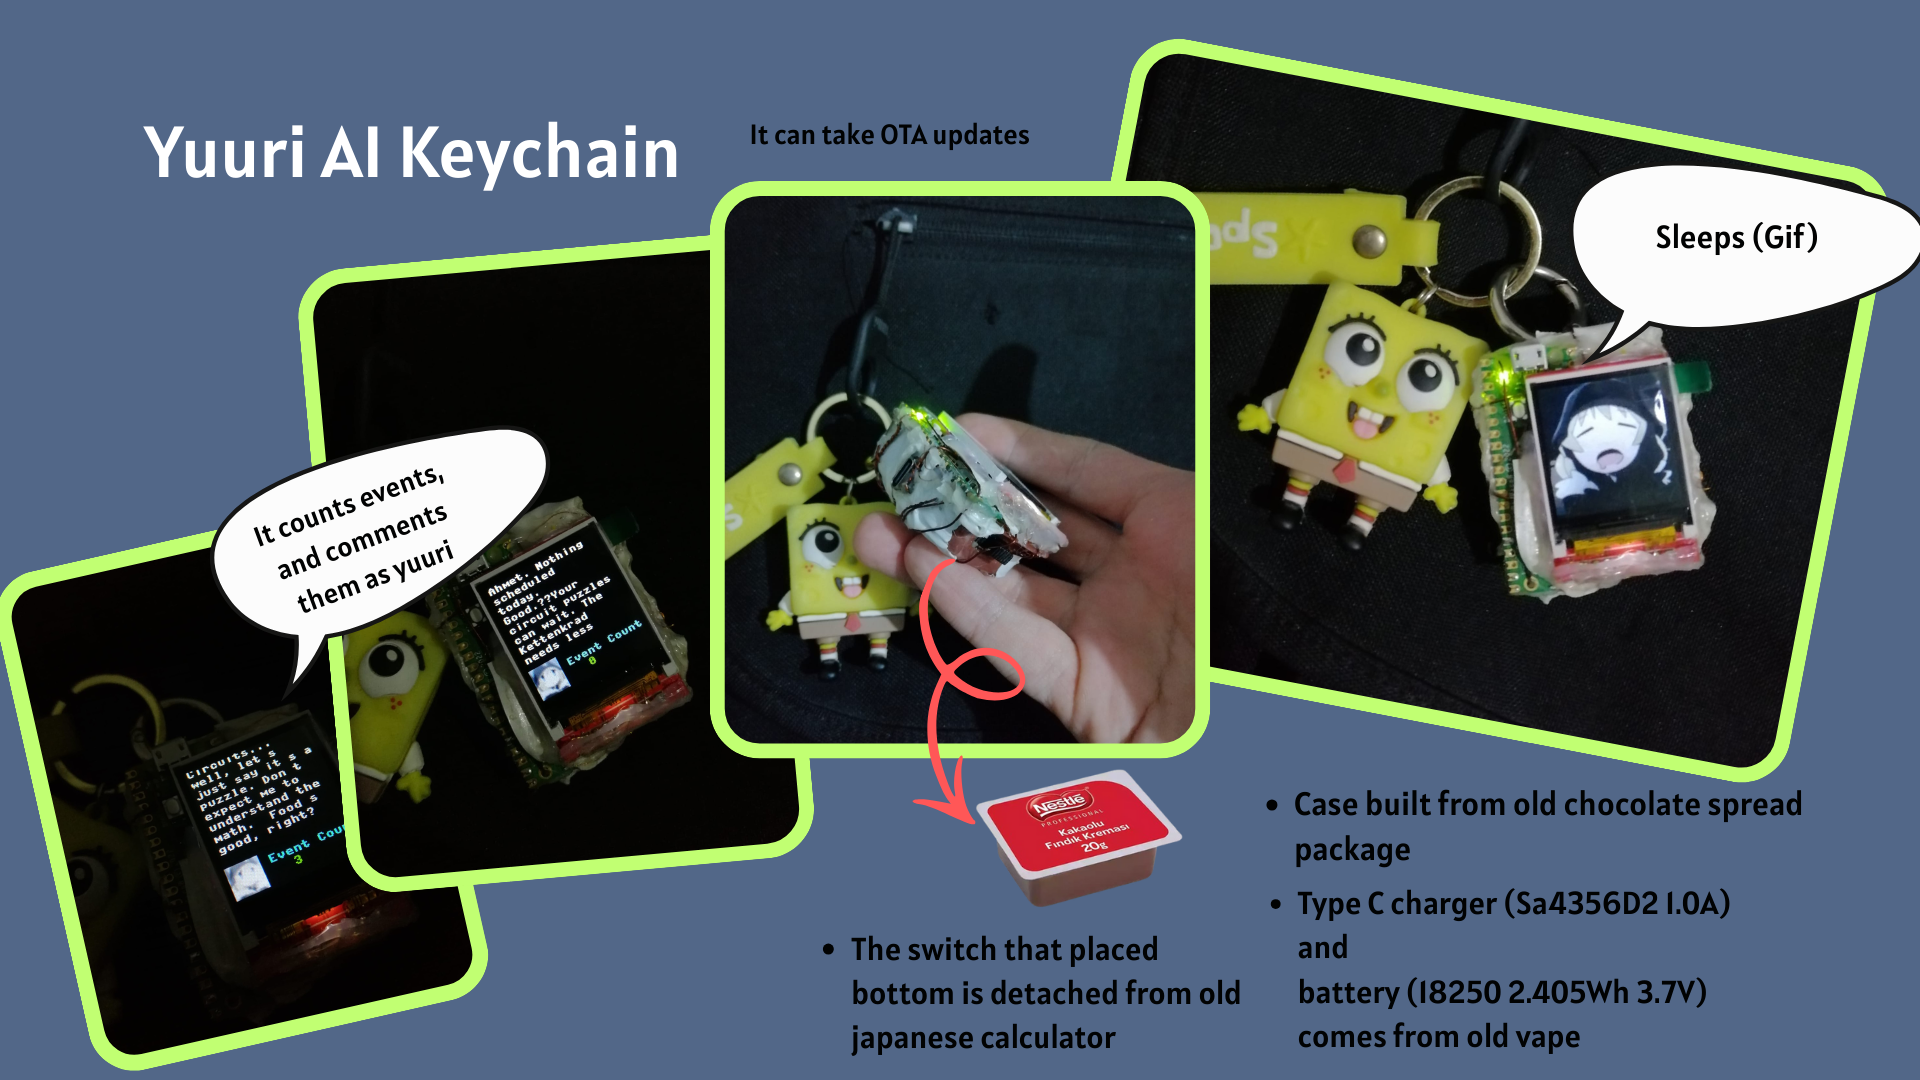
I had Raspberry Pi Pico W and 128x128 SPI TFT LCD Display, so I decided to make a keychain that takes my events from notion calendar and gives me reminders for those events as yuu from girls last tour.
It looks like this:
How it works:
Part 1: The Hardware
- Processor: Raspberry Pi Pico W
- Screen: 1.44” 128x128 SPI TFT LCD (ST7735 Driver).
- The Power: An 18250 Battery (2.405Wh 3.7V) salvaged from an old vape.
- Charging: A generic Sa4356D2 Type-C charging module. (Also found from old vape)
- The Switch: A power switch detached from an old Japanese calculator.
- The Body: The case is custom-cut from an old chocolate spread lid/package.
Wiring Diagram
     RASPBERRY PI PICO W                1.44" TFT ST7735
    +-----------------------+             +---------------+
    |                       |             |               |
    |           (SPI0) GP19 |------------>| SDA (MOSI)    |
    |           (SPI0) GP18 |------------>| SCK           |
    |                  GP13 |------------>| CS            |
    |                  GP14 |------------>| A0 (DC)       |
    |                  GP12 |------------>| RST           |
    |           (PWM)  GP15 |------------>| LED (BL)      |
    |                   3V3 |------------>| VCC           |
    |                   GND |-----+------>| GND           |
    |  VSYS                 |     |       +---------------+
    +---|-------------------+     |
        ^                         |
        | (+)                     | (-)
     [SWITCH]                      |
        ^                         |
        | (+)                     |
  +-----------+             +-----------+
  | Sa4356D2  |             |   18250   |
  |  Charger  |<------------|  Li-Po    |
  |  Module   |             |  Battery  |
  +-----------+             +-----------+
Wiring as table:
| Pico W Pin | TFT Pin | Function | Note |
|---|---|---|---|
| GPIO 18 | SCK | SPI Clock | SPI0 Bus |
| GPIO 19 | SDA | SPI MOSI | Data Send |
| GPIO 13 | CS | Chip Select | |
| GPIO 14 | A0 | Data/Command | Sometimes labeled DC |
| GPIO 12 | RST | Reset | Screen Reset |
| GPIO 15 | LED | Backlight | PWM Brightness Control |
| 3V3 (OUT) | VCC | Power | 3.3V Logic |
| GND | GND | Ground | Common Ground |
Part 2: The Workflow
Here is the logic flow:
- Boot & Splash: The device wakes up and shows a splash screen.
- Connection: It attempts to connect to Wi-Fi. If it fails, it enters “Offline Mode” and just plays animations.
- Time Sync: It connects to an NTP server to get the exact time (Crucial for calendar logic).
- Data Retrieval: It queries the Notion API to get today’s events.
- The “Soul” (AI): It sends the event data to Gemini API with a specific system prompt to rewrite the text.
- Display: It scrolls the AI’s message alongside a “” animation.
- Sleep: When idle, it plays a full-screen GIF animation of Yuuri sleeping.
- Loop: After 1 hour idle it starts from step one again.
Part 3: The Software Logic
It uses micropython, it is easy to handle filesystem with thonny ide.
File Structure in local:
/ (Root Directory)
│
├── boot.py              # Runs first. Handles Wi-Fi connection logic.
├── main.py              # Runs second. Checks for OTA updates, then imports app.run.
├── ota.py               # OTA update logic (checks GitHub for manifest.json).
├── version.txt          # Stores the current version string (e.g., "1.0.0").
│
└── app/                 # Main application folder
    │
    ├── run.py           # The main logic: Notion Sync, Gemini AI, and UI loop.
    ├── st7735.py        # The custom Display Driver with the BGR fix.
    │
    └── assets/          # Folder for your binary image files
        │
        ├── avatar.bin           # The static image of Yuuri (32x32)
        │
        ├── gunslinger_0.bin     # Animation frame 1
        ├── gunslinger_1.bin     # Animation frame 2
        ├── gunslinger_2.bin     # Animation frame 3
        ├── gunslinger_3.bin     # Animation frame 4
        ├── gunslinger_4.bin     # Animation frame 5
        │
        ├── frame_000.bin        # Start of the "Sleeping" GIF loop (128x128)
        ├── frame_001.bin
        ├── ...                  # (Rest of the GIF frames)
        └── frame_XXX.bin
File Structure in server (Your files can be stored in github if there is no api key in your code):
/ (Repository Root)
│
├── version.txt          # Contains the latest version number (e.g., "1.0.1")
├── manifest.json        # The map telling the Pico what files to download
│
└── app/                 # The folder containing your actual source code
    │
    ├── run.py           # The main logic script
    ├── st7735.py        # The display driver
    │
    └── assets/          # Binary assets
        ├── avatar.bin
        ├── gunslinger_0.bin
        ├── gunslinger_1.bin
        ├── ... (other gunslinger frames)
        ├── frame_000.bin
        ├── ... (other GIF frames)
🔑 Critical File: manifest.json
You must create a manifest.json in your repo root like this:
{
  "files": [
    {
      "remote": "app/run.py",
      "local": "app/run.py"
    },
    {
      "remote": "app/st7735.py",
      "local": "app/st7735.py"
    },
    {
      "remote": "app/assets/avatar.bin",
      "local": "app/assets/avatar.bin"
    },
    {
      "remote": "app/assets/gunslinger_0.bin",
      "local": "app/assets/gunslinger_0.bin"
    },
    {
      "remote": "app/assets/gunslinger_1.bin",
      "local": "app/assets/gunslinger_1.bin"
    }
    // Add all other assets here...
  ]
}
🔄 How the Update Process Works
- Check: The Pico downloads
version.txtfrom GitHub. - Compare: It compares that number with its local
version.txt. - Action:
- If numbers match (e.g., both are
1.0.0), it does nothing. - If numbers differ (Server is
1.0.1, Pico is1.0.0), it triggers the update.
- If numbers match (e.g., both are
- Download: It downloads
manifest.json, loops through every file listed, downloads the new version from theremotepath, and saves it to thelocalpath. - Restart: The Pico resets to apply changes.
Pico has no internal clock battery (RTC). Every time it turns on, it thinks it’s 2021. I had to implement a strict NTP (Network Time Protocol) sync with a specific timezone offset for Turkey (TURKEY_OFFSET = 10800 or 3 hours).
I use Notion as my primary calendar. The keychain needs to fetch specific columns: Event, Date, Location, and Category.
run.py:
def get_notion_events():
    # ... connects to Notion API ...
    # Filtering for TODAY only
    if date_only == today_str and time_str:
        upcoming_events.append({
            "title": title,
            "date": date_full,
            "time_until": time_str,
            # ...
        })
Gif to Bin Script
Also in github repo there is one script that translates gif file to multiple bin extension frames.
process_gif.py:
This script takes a standard GIF animation (like the “Sleeping Yuuri” animation) and converts it into a series of raw binary files (frame_0.bin, frame_1.bin, etc.).
Key Logic:
- Resizing: It forces the GIF to 32x32 or 128x128 pixels using Lanczos resampling for quality. You can change the resolution.
- Color Conversion (RGB565): The ST7735 display uses a 16-bit color format (5 bits Red, 6 bits Green, 5 bits Blue). The script converts standard 24-bit web colors into this 16-bit byte array.
- The “Blue Face” Fix: I discovered a quirk with my specific display module: it swapped the Red and Blue channels. Instead of rewriting the driver on the Pico (which slows it down), I fixed it in the asset pipeline by swapping the R and B bytes before saving.
def color565(r, g, b):
    # SWAP R and B for BGR565 (Software Fix for Orange/Blue swap)
    return ((b & 0xF8) << 8) | ((g & 0xFC) << 3) | (r >> 3)
that’s all.